Ice fishing season is upon us, and I’m really tired of hauling the gas auger around. Or having to plan ahead and have it to go fishing. And I had a Sportsman’s warehouse gift card.
And it was black Friday… lol.
Couldn’t quite convince myself to spend the extra $100 and get the auger made to go in a drill.
Found this instead, for about $13.
Handle the auger came with(yes my shop is a mess, sue me)
And the drive bar attached ;
I’m gonna get a safety wired clip or something on a longer bolt for that connector. Or put a nylock nut on it if I think its not too long in the truck.
Needs a big disc of something(probably plywood ) on the top as a loss safety too. Maybe a free floating side handle, we’ll see.
But yeah, this is to be able to not lug the gas auger around, and to be able to just leave it in my truck box, with a rod, tackle and chair , and just be able to go fish if I have time to kill.
Even if I need a newer brushless drill, I’m still ahead in the cost of a setup made for electric drills. And honestly, I can’t see my drills not cranking it. Even if it ain’t fast, I just need 1 or 2 holes, pretty sure it’ll work ok. At least through early or late season ice… gets much beyond a foot or 16″ of ice and I’ll just haul the gas auger out. But thats colder season where I’m not likely to go impromtu without the shelter anyway.
For $63 that I didn’t spend, I figured it was worth a shot. ;D
Or, quarter drive hex bits in a Zippo to be more accurate.
There’s been a few iterations of a hex bit holder in a zippo by “makers” in the last few years, and I think even one designed to be used as a driver handle, not just storage… Zippo probably owes someone money or at least a thank you on this lol.
I’ve even designed a couple, for 3D printing… never bothered yo do it. Kinda jusy didn’t see a poing to it, I have more ambitious aspirations for putting things in these cases..
So why’d I buy this?
I dunno. Lol. Just seemed like it’d be worth a look. Might be a nice companion piece to a mod Ixm working on too, but I hadn’t thought of that till just now.
Bug yeah, its rather nice. Bits sit on magnets, both the one on top and the three in storage, a nice touch.
Its intended to be removed from the case to use it(no lid interference I guess)
My only gripe is the top bit sits a tad low, and is hard to grip to get it out.. but they had to get the case to close, so I get why.
Fits a Standard case fine(didn’t come with one, but did include the 4 hex bits, #1 and #2 Philips, #2 flat, and a T20), didn’t fit my 1935 replica though. Papers say it will fit the 1941 though.
Not sure it’s real practical, but I’ll throw it in a jacket pocket for a while and see if I ever use it.
I even already have a modification to it planned lol.
Figured, if Anyone should/could be designing an EDC related item for printing, it would be me, right? 😉
Problem is, I don’t use the things!
I had one idea for this but brushed it off as too… hokey? I dunno, too rediculous in some way.
The more I thought about it, I couldn’t get really entheused about it, because I don’t use the things… I have a specific place I put current carry, its a dump place, but I’ve never done the whole box/tray/ whatever thing, unless I’m house sitting somewhere and need to Create a safe place. Its just not ever been a me thing at home.
But, THEN the more I think about it too, it could be a fun project to model my idea, and who cares if its a little over the top on a theme? So, for the fun of it, Iwent ahead and did it.
I give you, The Alaskan Dump Tray. Or The Log Cabin Valet tray. You’re choice.
And the Mini version,
I got a little carried away, I have it as a fully parametarized file(As in it runs in the OpenSCAD customizer pane, there all parameters are easy to edit by Anyone with the software, no 3D or coding experiance needed..Poimt and click without editing the model(s)) Can change; The log height(count), log diameter, inner area length and width, turn on or off 1 or 2 inner walls, and move the two inner divider walls around(although they always cross and make 2 compartments equal length… I’m too lazy so far to cut it up and make it 4 walls if wanted), and the inner wall height and log diameter is settable independantly of the main walls, and each other.
The big one Barely fits on my printer, and actually is barely big enough for what I’d want/need. The little one was a compromise of print time, and space… I can get my average knife, light, multi and watch into it.. Although ironically todays items don’t fit. lol. I printed the little one to have something to take pics for the contest, and because it was only 4 hours to print. The big one would take 7.5 hours, at my coursest resolution.(I printed the small one course for both time, and I figured the rough layers would look better for logs… it does fit I think!)
For this one I went with 3 courses, 10mm dia on the outer walls, and 8mm on the inner wall, seemsed like a good look, and a nice scale. Fresh off the printer!
Some shop gear “EDC” in it;
And, some of today, the basics.
Overall, I’m rather happy with it! Looks like I wanted, and isn’t anything bad like I’d imagined it might end up. I think it came out just fun and interesting, not over the top on “Alaska” or log cabin woodsie LOL.
Stumbled upon something I hadn’t seen before when Christmas shopping, but having no real need filed the idea away.
That idea, is mini speed squares. The speed square is without a doubt a handyman or construction workers most used tool. Layout, measurements, angles, checking square, and a great crosscut circular saw guide.
But sometimes, all you need is a 90deg or 45deg marking guide for layout, and dont want to carry a full size square. A lot of guys tend to use a 4″ slip square for that. I have for years. But its still a 3″x4″ chunk in the pocket, and without the angle guide, or saw guide.
Now granted, I’ve never used the angle guide more than twice in my life, and a 3″ square is not going to be a good saw guide. But I was still intrigued by a small light pocket square.
Enter 3D printing (yes, again lol) and I stumbled upon a mini and micro speed square design on Printables. There are actually several there, even metric versions. But these looked promising, with all the measurement and angle hash marks. One at 3″, the other at 2″.
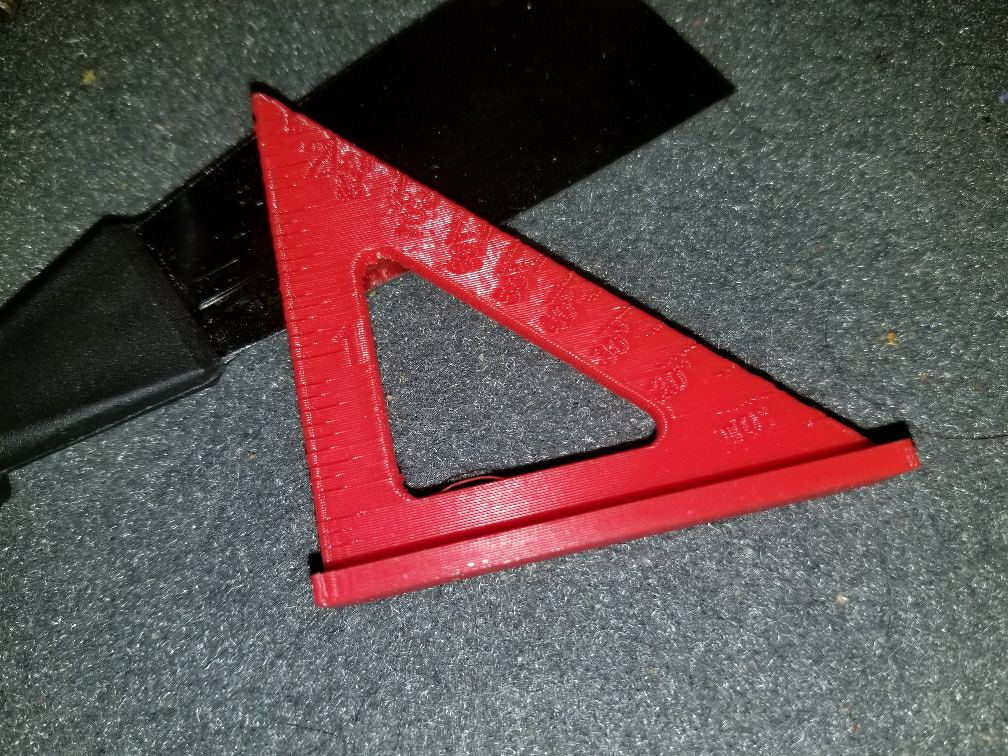
I printed the big one, in red PLA.
Now, I was absolutely amazed. The precision of my printer setup hadn’t been the best, and I knew I had it pretty damn good, but this was still cool. I’d avoided printing anything with exact measurements for this reason(yes, printing parts to fit other parts, but not to a measurement without tweaking the scale for print error.)
Anyway, the measurement scale on it was dead on for a long ways, only walking a 1/64″ or less after the 3″!! yes thats off, and off quite bit in 12″. But when you’re always printing under 8″ and usually under 2″, a few thousands off per 1/16″ isnt too bad!
And also for carpenters tools, in construction not cabinetry, its fine. This isn’t precision machine work.
Now, the angles were something else. The 90 came out at 89, but the 45 was dead on. Which isn’t horrific! But even for a marking tool for construction, I wanted as good as I could get, at least within the tool… some drift 10 feet away is fine lol.
Some could be shift in my printer, again, its not 100% tight, and this process has inherent movement, that (can)causes drift as you go… momentum and sheer force on molten plastic.
Or the guys model could be out of square. I also wondered how accurate the average metal square is anyway. I’m using a digital angle gauge to check with, assuming thats pretty accurate.
All other squares in the shop were within 0.4 to 0.5 degree of 90. A couple were dead on. Thats a full size 1960s era Swanson speed square, a Craftsman or Stanley 4″ slip square, and a 18″ framing square. Good sampling of styles and costs, and sizes, seems half a degree is it.
So, I modeled a simple square myself, and printed it.
Same 1 deg off! 89.0 So. Printer? Maybe.
I basically decided to ignore my OCD on it and accept 1deg out for what its used for. I remodeled, added the features I wanted, and beefed up the structure(test print was fast and light), and re printed it.
And you know what? Thag sucker is dead on 89.9, and 44.8!!
Printed a second one smaller, just the same.
Now, I’m not saying the other guys model is out of square. I will go back and re-slice it finer(although it was at the same resolution as I just printed mine) and see if it comes out any more accurate.
At any rate, I had fun modeling, and testing, and got the features and size I wanted, without things I don’t use. One for the shop, and one for my tool bag, will see how much I actually use them.
Now, my models turned out to be less speed square than where we started. They are 2″, or 2.5″on the thin 90deg leg, 1/4″ overhang on the edge on one side, 1/2″ on the other for marking gauges. No angle or length marks. A simple and fast layout tool. Plus one hole for a caribiner or similar, if I can find a way to use it that doesn’t get in the way, or be too fiddly to remove and replace all of the time.
Any interest in the comments, an I’ll make my model file available. 🙂 Otherwise, there are so many out there, including the other one I started with, I see no reason to release it.
The other guys square is here; https://www.printables.com/model/312095-pico-squares-small-speed-squares Also, PLEASE NOTE There is NOTHING wrong with his model! It is fully within normal parameters, especially for a printed part… 30 seconds with sandpaper on a flat surface would make it dead on square! Heck, you might even print it dead on to start with. Given how many variables there are in this game, 1 degree is a fantastic low variance. I was just being super picky about it, and wanted to see IF I could do better straight off the printer. Not that it really needed to be any better. Hell, the next one I print of my model could be off farther…. 😉
Wanted to build a little socket set for part of this kit to go with a 3/8″ impact driver. Needed a way to keep them all in their side of the box. Couple/three hours (not sure, 3 projects at once…) modeling and test prints for fit, 3 hours printing lid and support blocks, 1/2 hour assembly. Supports have captive magnets, and are screwed and (hot) glued in. Magnets press fit into the lid. Good and secure, can put the sockets in it and lift that side of the case! Can also put the sockets in it turn it over and shake the heck out of it, but not the sockets; lid stays put! OpenSCAD modeling, Cura slicer, Elegoo Neptune 2S printer. Hatchbox Blue and Silver PLA.
Had some bed adheashion issues, and layer adheashion issues, that resulted in the scars(once one layer is scarred it just continued upward with the scar till the top… It didn’t smooth over them. )Its clean enough for a functional print, IE not having to be purdy just solid. I don’t like it in principle, but in application I don’t mind it, it adds character.
A couple months ago, soon after my shiny new 3D printer arrived, (yes, yes, need to post about that in details, I know…) with new flashlights, and playing around with carry concepts, I’d found I needed another Prangler. its been my favorite EVER for keychain carry, I have it at 11oclock on a belt loop all the time. Always secure, never a problem, I’ve never lost it off of me, but its the fastest easiest access.
Decided I wanted that for my flashlight, which has for years been caribinered to a belt loop at 9oclock.(southpaw!) Yes, I’ve played with different carabiners and clips before. Just before this I had gone out and found THE perect caribiner, and also, had splurged for one new Prangler.(looks like that post about caribiners missed being Here… Will try to get it uploaded!)
Whats new now, was I found I needed about 3 more of them. 1 on keys, and one to swap around on 4 or 5 flashlights is a PITA. But I’m unimployed for the year, and funds are short for Titanium trinkets… For a while now I was going to ask Eng1nerd Designs if he minded If I just made myself another Prangler, maybe in brass or copper. But I couldn’t do it, felt too cheeky.
((ANyone interested in a titanium Prangler, let me know in the comments and I’ll get you in touch with Zach, AKA Eng1nerd 🙂 ))
Also recently, winter had finally caught up to us, and I re-discover another issue, that I’ve had with ‘biners, and now the Prangler; its 0F to 10F out and I’m wearing heavy gloves. I CAN opperate a biner with them, but its annoying. I do the prangler for my keys pretty well, because most places I need them, I can’t get the key I want, or unlock a door with the gloves on.. So gloves off for them is fine.
But for the lights, I’d like to stay gloves on if I can.
Also something else I’ve thought about, is I have NEVER used the Pry feature on the Prangler. Actually thought about grinding the tip off the 2nd one I had just got.
So, you might see where this is heading…
I took what I liked and needed, in basic form from the prangler, added, subtracted, and designed my own belt loop dangler.
Enter, the Grangler. G(rippy D)angler.
First was to sit down and copy the Prangler. and do a test print on my geometry, I wanted the same slot/loop hole size and shape, it works so perfect on the Pranglers.
Then, add and subtract what I need and don’t. Rounded off the top end, no more pry bar. Removed the mid and upper holes, since I’ve never hung anything from them, to me it gets too messy/bulky and rats nests too much.
Then, added a wide grip area to that side. And realizing the holes if nothing else provide grip texture, put them back, but in 1/4″ hex holes. No I don’t intend to ever use them as a driver, after all its in 3mm plastic… But in a pinch its possible. I just wanted traction.
Voila!
As I went the thickness progressed, from the same as the Pranglers, up a bit, then a little more. The thickest one I have is about 4mm(3.81mm or 0.150″), and I used two different “fill” patterns for strengths… can’t tell any difference, they’re all about the same strength. The narrow side bar on them all is springy side to side(width of the bar), and a little more top to bottom(ie with the thickness) which is still fine. I can pull on both bars as hard as I can sideways(direction it would pull if I snag what ever I have on it) with just the finger grip I can get, I can’t break the sucker off!
The outcome is perfect! The grip is great, even with gloves, they hang just like the Prangler, safe and secure, but easy on and easy off, AND with the gloves on its no hitch whatsoever!! I had been a little worried about the PLA in the cold, but several weeks now of constant use between 30F and -40F, and you figure the only heat these get is anything radiating off my hip… not a lot lol, it never seemed brittle, or anyway I didn’t notice if it was, didn’t seem to bother it at all.
So far I have about a dozen of them on various flashlights, knives, and tools. In 4 different matterials, and almost a dozen colors. PLA and wood fiber PLA, PETG, all work fine. The translucent white ones up above are even Glow In The Dark!
This is the project that caused battery boxes in the previous post.
Realized one afternoon recently that I needed a within the day relaod for my pocket pistol; after having to shoot at a stray violent dog, I was left with only 3 rounds in my CCW for the rest of the day. Not that I needed to reload to actively shoot, but I needed a reload for any possible shooting later in the day. Something in between carrying a full box of ammo and a true reload in another magazine(which I’ve done in the past and never needed, and find a useless weight/cost). Came up with this, compact and easy for day bags, glove boxes or even jacket pockets.
Modeled on official cartridge specs, plus a few mm at the to for different brand lengths, and a 1mm inclusive diameter clearance, for easy slip in and out. I wanted them loose for ease of handling, don’t care that it rattles a bit. Scale it up a bit in x,y, I’m sure I could get 9mm into it just fine. Only 6 rounds for compactness, and my pistol only holds 6+1 anyway. If I ever think I need more, I’ll make one longer. 😉
This version is printed half in red Hatchbox PLA, and the lid in Sunlu PETG… Why? because the PETG is new to me(great Christmas present from @alaskalinuxuser )and I could.. 🙂
Again, this uses a trick I found on youtube, Negative Volume Printing, to print inner and outer contours as one line in vase mode, fast and easy. No infill, and a split side, but plenty sturdy enough for this task.
A great bonus to doing this, other than its just fun; 2nd maganzine; about $60 last I checked. This box; couple hours at the computer and about $0.50. 😀
The Files are again available at Printables, but honestly this is obsolete, unless you just want 6x 380 auto. GO look at the Barry Carriers instead, if you have access to OpenSCAD, the custom parameters (NO coding needed, its point and click!) you can make these for Any cartridge, and any count. (as long as it fits on your printer!) And yes, technically these will print outside of vase mode, if you want infill and some more structure.
Well, kinda… This was a drift of another project I did in the last few days, a small cartridge box. Realized the same design could be made to hold just about any cylendrical item… like a battery. SO I remodeled from the ground up to give me a fully parameter-izable model. Now I just plug in numbers and I get different sized cases.
I Have wanted a safe way to carry a spare 18650 for a while(not that I HAVE a spare but thats besides the point… I have ended up with a loose cell some days and its annoying. )
Anyway.
battery cases!
I did 3 basic designs for me, a 4xAA box, a 3xAAA box(headlamps anyone?) and a 2×18650 box(somehow, not shown… hrrm.). Need to go back and do something for 2 or 3 16340 or CR123, just in case I ever need it. OR wait till I need it… lol. That was the concept to an easy to use pre modeled file.. Print as I need things instead of 2 days of modeling every time.
These are printed in PETG, a little stronger than the other plastic I have(PLA), with a good heat resistance, and a bonus of being resistant to most chemicals, and waterproof(most soda and water bottles are PET or PETG).
To be geeky; they are printed from a 0.4mm nozzle at a whopping 0.8mm line width(everything says not to go over 150% of nozzle width, which would be 0,6mm… I haven’t had a single issue with 0.8mm. Tempted to try a full 1mm.) in vase mode(Spiralized outer contour in Cura) at 0.25mm layer height, 235C nozzle, 70C bed temps. Filament is Sunlu 1.75mm PETG. All from a Elegoo Neptune 2S.
I’m trying not to totally 3D geek out in these printing posts, but will tell you a little about the mechanics, and the trick I found, for getting these to print in a different style.Normally these would take about 1.5 hours to print top and bottom, and use about a dollars worth of plastic. IN “Vase Mode” they print in 1/3 of that time, and use half the plastic, or less. The thing is, that Vase mode, normally only prints the outermost surface of an item as one continuous line. It compketely ignores the insides no matter what it is, and can’t print any horizontal surfaces beyont to base/bottom. Thanks to a guy on YouTube, I now have a trick. You slightly change the structure, by slitting into the side of the object, connecting the inner and outer surfaces, in essence tricking the software so it prints both. No top surface, and Slight loss of structural integrity(although the clearances could be tightened so that the lines touch and fuse at the ends! ) but for most things the difference is negligable…. UNless its something you plan to run over with a tank… then this might not be a good approach. 😉
Anyone interested in the print files,both STL and the fully parametarized OpenSCAD file to create different boxes, I have it uploaded to my account at printables. A big bonus, this will make cartridge boxes, just need dimensions of the cartridge in question!


![[IMG]](https://akadventurer.files.wordpress.com/2022/11/20221031_0904471.jpg "Click this image to show the full-size version.")
![[IMG]](https://akadventurer.files.wordpress.com/2022/11/20221031_0905181.jpg "Click this image to show the full-size version.")
![[IMG]](https://akadventurer.files.wordpress.com/2022/11/20221031_0905391.jpg "Click this image to show the full-size version.")
![[IMG]](https://akadventurer.files.wordpress.com/2022/11/20221031_0946081.jpg "Click this image to show the full-size version.")
![[IMG]](https://akadventurer.files.wordpress.com/2022/11/20221031_0946431.jpg "Click this image to show the full-size version.")
![[IMG]](https://akadventurer.files.wordpress.com/2022/11/20221031_2320001.jpg "Click this image to show the full-size version.")
![[IMG]](https://akadventurer.files.wordpress.com/2022/11/20221031_2320521.jpg "Click this image to show the full-size version.")
![[IMG]](https://akadventurer.files.wordpress.com/2022/11/20221031_1838501.jpg "Click this image to show the full-size version.")


